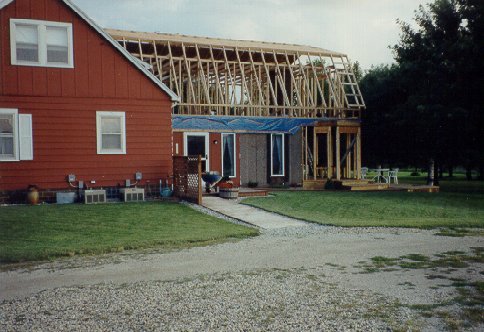
If it seems to you like we skipped part of the project we did. the framing of the first floor sun room went so fast we failed to capture it on film. The project was simple and we had it done in one day. The real project was about to begin with the addition of ceiling/floor joist to extend and square up the what would be the second floor. This turned into a project as I found that the cantilevered overhang had sagged a bit and I would need to do some shimming and fixing to make a level second floor and a flat sun room ceiling.
As mentioned in our opening page the rain started the same weekend that I had to open the roof to start the second floor framing. I don't want to dwell on that horror story but a brief explanation is needed to understand how this happened. Since I needed to frame a center wall and two knee walls for the second floor it was necessary to srip off enough roofing to get down to bare sheathing. I started on the north side and stripped a four foot off the north edge and installed black felt (tar paper) over the sheathing and doped up the seam between the old and new with enough roof cement to seal it up, or so I thought. I framed the short stub outside wall first then the 8 foot high knee wall four foot in from the edge. The next day I stripped a foot wide piece up the center of the roof and followed the same procedure so I could construct the center knee wall. It was at this point that the rain started and neither of my patches worked since the roof was dead level and the only pitch was from the built-up roofing material. The water just laid there soaking through my patches and made life miserable. As I look back on this project and try to think of a better way to avoid the water problems I think I would have stripped the entire flat roof off the addition and then covered it with felt and a layer of heavy black plastic. I could then have built over this layer and could have had a nearly seamless plastic roof until I had it covered up. But that is hind site, which is always 20-20.
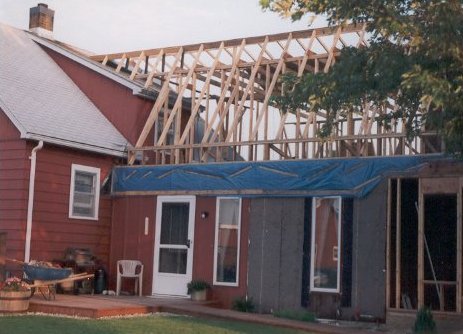
This rain started on the 4th of July and continued for a month. I bought plastic and tarps to try to seal off the roof but nothing seemed to work so I just pushed forward with the work while Sandy tried to keep things mopped up below. In the image above you can see the complicated framing job I faced as I met the old house roofline, and in particular the old dormer. My original planning called for ripping into the dormer and frame past it, but it was obvious with the rain that this would need to wait until another phase of the project. Notice the blue tarp that was intended to keep the roof dry after my initial attempts to stop the water. You will also note that I did not even bother to apply the sheathing to the first floor as I would normally have done. My one goal was to get the roof sheathing on and plastic on it to stop the leaking.
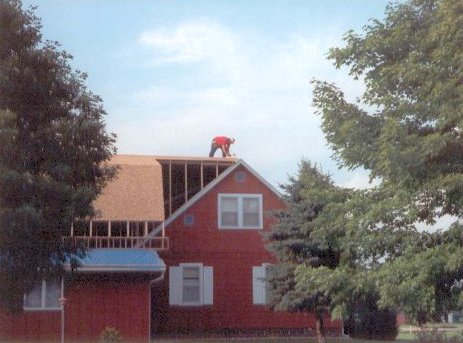
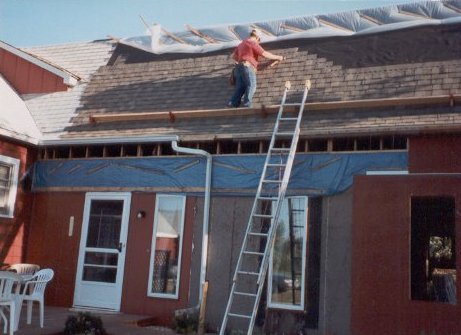
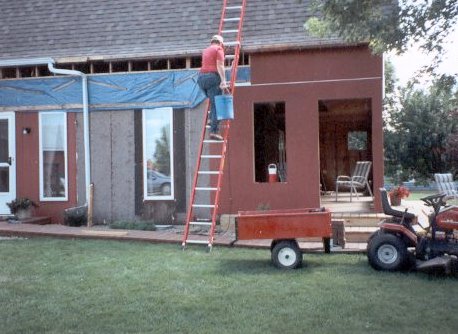
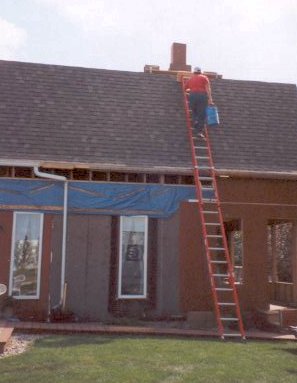
Sometime early in August the rain stopped and I had the sheathing nailed on. Just to be sure I covered the entire roof with clear plastic (it was cheap) to protect the family room from any more rain. Then I went to work on the wall sheathing that I had let go. Sandy had rolled red barn paint on all of it to save time and after a couple weeks it was all in place and time to move onto shingles. I constructed every bit of this phase with regular nails and a hammer and did the same for the shingles. I determined that the next phase would see air nailers as my arm and elbow were about shot from the nailing. You can see in the picture below my shingling toe hold and ladder arrangement. It took a long time to work my way to the top, and then I moved to the south side. You can also see that I did not comnplete the sidewall sheathing on the sides, no rain worries here.
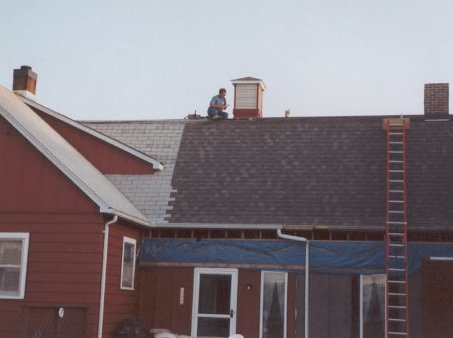
The final steps to sealing up the roof on this phase of the project involved completing the extension of the chimney for the wood buring fireplace, the cupola, and the sky lights. The sky lights were a very easy project that was not recorded on film, but Sandy did want to have pictures of a project that had her worried, the chimney. I used a 16" square clay tile flue liner to extend the original flue up another 6 foot. The sections were so heavy that I had to cut them in half and then carry them up one at a time. The brick, block and morter went up the same way, one bucket full at a time.
I have never really had much experience with brick or block laying, but I knew the process and was careful to take it one careful step at a time. We have heard too many scarey stories about do-it-yourself fireplace projects that end up causing fires. The liners were mortered togeter with a thin layer and then surrounded with cinder block below the roof line. I left space between the liner and the block just like the chimney below and when the chimney passed through the roof changed over to brick. We were fortunate that a previous owner had left a pile of brick behind in the machine shed and when we pressed him to get it out or loose it he decided it wasn't worth the work to remove it.
The clay tile chimney liner is in view in the image above as I head up top with another load of material. I spent nearly a full weekend on this project and was very pleased with it when it was complete. I flashed the roof and counter flashed the chimney with a bronze colored aluminum that blended well with the roof and brick color. Then it was on to the cupola. I wanted this feature to make it look like a real barn, but my first attempt met with my dismay. It was a simple project in which I used stock gable end louvers for the sides and topped it with a shingled roof. But after looking at it completed I did not like the scale of it compared to the house so replaced it some time later with a cedar structure and a copper roof.
And that about wrapped up the project, and just before the weather turned bad on us. I completed the sheathing and battens without any worry about weather and had the entire structure completed before running out of money or time. Right in the middle of this final leg of the project we did a bit of salvage work on a business structure we were involved with as we moved it from one location to another. As part of this salvage we were able to acquire some addition 2 X 4 material that was used to truss the rafters that were hand framed. We learned a lot about timing our projects with the weather and staying focused through minor disastors and also looked forward to the next phase, the bar, entry, and completing the gambrel roof.
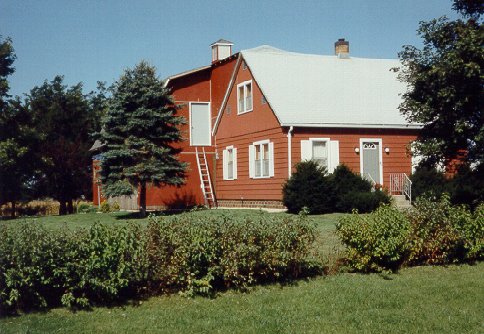
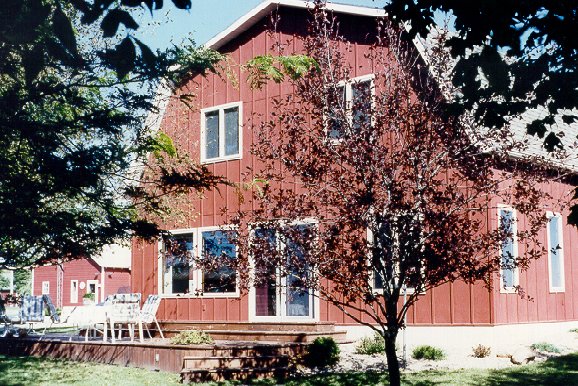
As we close this page out we thought we'd show you pictures of how the structure looked when we finished it. These pictures were taken the following spring but do represent the way the project looked upon completion. In the picture above you see the goofy looking roof line and the door to no where. This door was the only entrance to the new second floor other than crawling through the old dormer window. But we had little need to be up here during the winter so didn't mind getting out the ladder when needed. The picture below shows what our dream really looked like. Although we were anxious to get some siding on it and get rid of the barn red (we had others that thought is should stay red) we were happy with the way this west end turned out.
Please return to the Sunroom and Gambrel Roof project page for more information about this phase of our home renovation.
Return to the projects page.