
Airline Radio Page
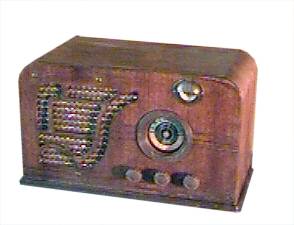
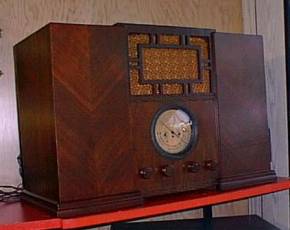
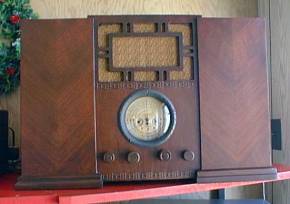
Here is a project that I just completed (mid July 1998). This Montgomery Ward, usually known as Airline, came to me in very poor condition. The cabinet was falling apart and the chassis was covered with rust. It was a real challenge to see if this would become presentable
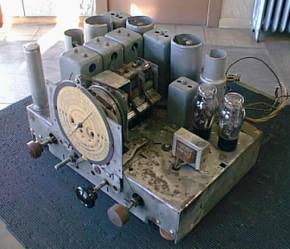
I had to nearly strip the chassis and then wire brush it to remove most of the rust. I located 4 good tubes to replace the bad ones; one was workable, in this five tube super heterodyne design. This radio was originally manufactured in the late thirties. It also required all new capacitors and even new adjustment screws in the IF transformers.
The cabinet required many hours of gluing and filling in of missing veneer. The bottom trim was missing a piece on the right side and I made a replacement by hand as I have no router. A sharp knife and Dremil tool was used instead. The finish was sanded, staining and finishing with polyurethane.
Montgomery Ward Model - 62-217
This radio came to me as a gift from a friend. Most of the cabinet was in very poor condition. The front panel was remarkably good in relation to the sides and top. The veneer was coming off in large pieces with the top suffering most of the damage. The picture below shows the radio as I received it.
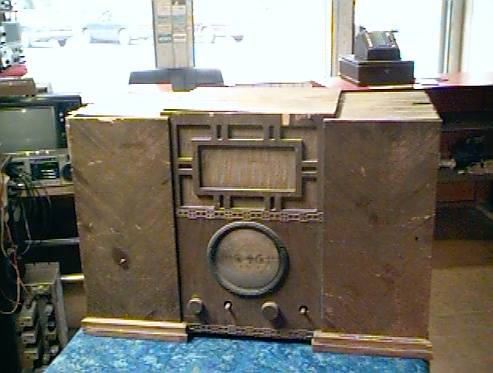
The chassis had large rust spots from mice that at sometime made this their home. Closer examination also reveled that they had been busy at the underside of the chassis as well. Some of the wire connections showed evidence of their busy work. But even worse than the wire was their activity on some coils that had been chewed. This was going to require lots of work to make it play again.
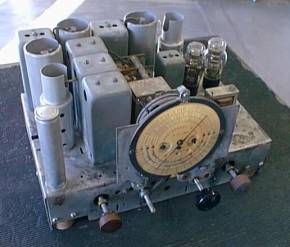
This is a battery powered radio dating back to sometime between 1934 to 1935. It has a listing in Rider book 6-41. It required 3 - 45 volt B batteries, 2- 4.5 volt C batteries and a 2 volt A battery (lead acid wet cell). This picture shows open spaces in the cabinet for the batteries.
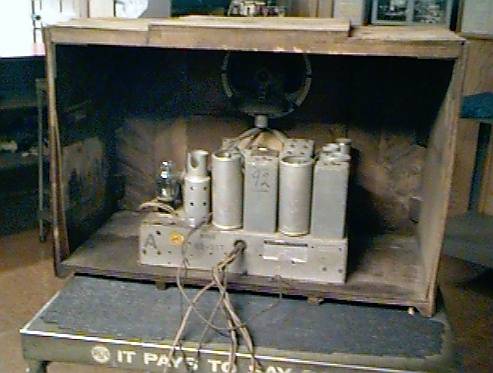
The tube line-up consists of the following: 34 RF amp., 1C6 mixer ocs., two 34 IF amplifiers, 30 detector, 30 first audio and a 19 power output amp to drive the magnetic high impedance speaker directly with no matching output transformer. I was able to repair the open coils that were chewed, which was no small task. The rest of the repair was routine work. Not too many of the capacitors needed to be replaced and the alignment was a routine chore. The pictures below shows the chassis after cleaning it up and completing the repairs.
I constructed a AC power supply to do away with the need for battery's . The performance was extremely good . The sensitivity with just a short wire antenna I was able to tune in a great many short wave stations as well as distant broadcast stations. I was real pleased that I was able to breath some life back in this old guy, I thought at first look that this may be beyond repair.
The cabinet, on the other hand, was beyond my abilities. I knew that it would be impossible to re-glue the veneer like on the other radios I have restored. There was too much damage and some of it was missing. So I spoke with my son Dan to see what he thought. We e-mailed pictures and descriptions back and forth and then he made a trip over to Estherville to diagnose the situation.
I feared the worse but he said he could work on it an make it look presentable. He discussed the need for new veneer and some case work but thought it was well worth the work. He also wanted to fabricate two of the knobs that were missing. I will let his work speak for itself in the pictures below.
Click here to return to my Restoration Page or here to return to my Home Page
If you want more information please send me e-mail.